Note
I wrote an up-to date version at http://raspberry.io/projects/view/a-rapsberry-pi-juke-box-1
Note
Follow-up on the hardware: http://blog.ziade.org/2012/07/04/my-raspberry-pi-juke-box-follow-up
After 3 months of desperate wait, I finally received my Raspberry Pi (R-Pi) box from Farnell, including a nice Element 14 T-Shirt.
I had a few projects in mind involving some hardware hacking, and ended up deciding I would do a simple project first, that would work with a bare R-PI.
The project is a wireless Juke Box I can run anywhere on a local network, people can access to and add songs in a queue.
The final project will be a small box containing the R-Pi and a few peripherals:
- a USB Stick to add more space for the music. I picked a PNY 16G that's very small. See the Amazon Page
- a USB Wifi extension. I ordered the Airlink Nano but did not get it yet.
- a USB battery so I don't have to plug the R-PI to a laptop or any power source. I ordered this one and it should be enough to power the system for hours hopefully. The open question is: will the R-Pi have enough power so the wifi usb stick works ? If not I'll have to add a powered USB hub, and figure out how to plug it into the battery.
- A mini speaker. I ordered that one because it seems like a very good speaker according to the reviews. It can be charged via USB as well, and you can chain several one of them. I don't expect a rich sound with deep bass given the speaker width, but as long as it's clear enough I am happy. And I can always plug a real set of speakers if needed.
So, until I receive the speaker, the battery and the Wifi stick, I can start and build the system.
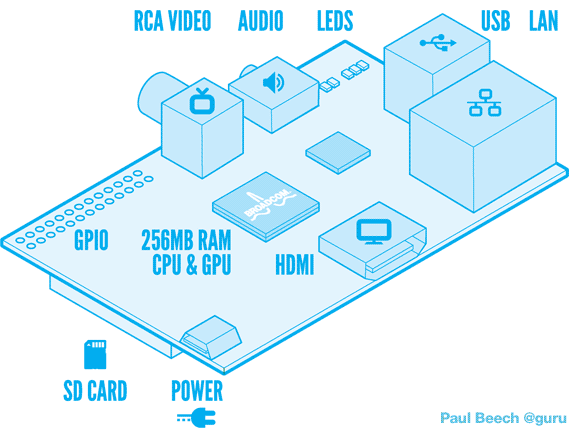
The SD card
When I received the R-Pi and started it with a flash card, it did not work at all. I controlled that the board was powered, using a multimeter, then I tried with 3 different cards, suspecting something was wrong with that.
The last one kind of worked, but the Pi was freezing with an ugly -101 error during the boot process.
Turns out the Pi is simply not working with some cards. It's not a matter of how cheap or expensive your card is, or the brand. Some work, some don't.
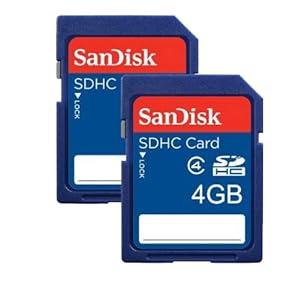
So if you get a Pi make sure you have a SD card that's listed here: http://elinux.org/RPi_VerifiedPeripherals#SD_cards
I went to a supermarket and bought a SanDisk SDHC 4G class 4 at 5 euros that was listed there, and it worked like a charm.
Setting up the SD Card in Mac OS X is quite easy. There's even a Python script called RasPiWrite for this, but it bugged for me so I did it by hand. You basically get an image and dd it on the card.
I used the default Debian the R-Pi project provides:
cd /tmp
wget http://files.velocix.com/c1410/images/debian/6/debian6-19-04-2012/debian6-19-04-2012.zip
unzip debian6-19-04-2012.zip
Once you have the image on your disk, just plug the SD card to your computer, unmount any partition that gets mounted and create the disk:
diskutil umount /dev/disk2s1
sudo dd bs=1m if=debian6-19-04-2012.img of=/dev/disk2
diskutil eject /dev/disk2s1
My first attempt failed because I was calling dd on /dev/disk2s1, not on the root - /dev/disk2. It was copying the image but the R-Pi was not booting of course.
Once you have it right, plug it and run your R-Pi. You should get a prompt to log in. The R-Pi user is pi and the password raspberry.
Note
My Pi restarted automatically several times. Looks like the normal behavior the first time you run the Debian image
The next issue I had was about the partition sizes. Playing in the R-PI I ended up out of space really quickly and realized I had only 2G instead of the 4 gigs my card has. The Debian system is around 1.7G so it's not really usable if you don't resize the partition.
To do so, you can just follow this excellent blog post, and apply everything the author proposes.
System update
Once your R-Pi happily runs, it's time to update your system so you have all the required packages.
If you applied all Gordons tips, you should be able to access to your R-Pi from your computer via SSH by plugging it to your local network. Booting the Pi with the network cable plugged will DHCP for you. The IP is displayed somewhere in the startup screen. Or just nmap 192.168.1.* on your network.
I highly recommend working via SSH because the video output resolution is really bad by default and will burn your eyes. Maybe there's a simple way to change the resolution but I failed to do so.
Now for the update:
sudo apt-get update
sudo apt-get install alsa-utils ntpdate mpg123 python-virtualenv libshout3 libshout3-dev pkg-config python-dev
This is the minimal setup to my knowledge to run the Jukebox app.
Sound
By default the sound is not activated, and once activated it plays via the HDMI port. If you want it on the jack, you need to change the settings with amixer.
sudo modprobe snd_bcm2835
sudo amixer cset numid=3 1
If you want to go back to the HDMI output, just do:
sudo amixer cset numid=3 2
Then try a WAV file to check that it works:
wget http://www.freespecialeffects.co.uk/soundfx/sirens/police_s.wav
aplay police_s.wav
I found these tips here. Not sure why the author use sudo. It works with your pi user of course.
USB Disk
I had to manually mount my disk:
sudo mkdir /media/usbstick
sudo mount -t vfat  -o uid=pi,gid=pi /dev/sda1 /media/usbstick/
I then tried to play a MP3 file:
mpg123 "/media/usbstick/Renegades Of Jazz - Go Jazz Not Ape! Vol.2.mp3"
Great success  -- and great mix from ParisDjs.
JukeBox
The initial plan was to write a web app my self, on the top of gst-python, by installing Gstreamer.
But after 3 hours of trying to make it work, installing many packages, and trying to understand why this #%*! alsasink failed with gstreamer, I just wiped my image and went for a simpler solution on the top of mpeg123, which works really well and don't have all those dependencies like GTK.;
And then I found Jukebox which is exactly what I wanted to write. And it works with mpeg123 so why bother :)

To install Jukebox, simply create a new virtualenv with a fresh Distribute:
virtualenv --no-site-packages jukebox
cd jukebox
bin/easy_install -U distribute
Then just follow the instructions on the Jukebox github. everything should go smoothly with the libraries installed previously.
Yay, I have a R-Pi Jukebox
It sucks almost 100% of the CPU - Maybe I should profile the Python app, because it's the one sucking the CPU, not the mp3 player.
What's next
I received the hardware and built a lego case: http://blog.ziade.org/2012/07/04/my-raspberry-pi-juke-box-follow-up I love this small computer.